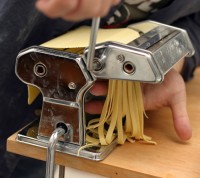
Anybody who knows pasta knows that there are few pleasures like owning your very own pasta maker. Once you’ve sampled a fresh batch of homemade egg pasta – or buckwheat and basil pasta or spinach pasta – then you aren’t likely to go back to buying dry pasta in stores. Why should you? Those delicious noodles, whether baked with a blend of sweet and spicy sausage or simply tossed with tomato sauce, are unforgettable.
Of course, making pasta from scratch does mean that your pasta maker is going to see a great deal of action. And that, in turn, means that is is going to have to be cleaned on a regular basis. This can be one of the most frustrating aspects of fresh pasta. You want to eat – not clean!
But cleaning your pasta maker is essential if you want to ensure that the machine will last for many years and always function at its optimal level.
Place the pasta maker on a level surface. Be sure that there is enough room for you to work – you are going to be expending a lot of elbow grease! If you have instructions for cleaning, then follow those. But if you don’t, then you can rely on common sense. Pasta makers are not complicated. If you don’t rush the process and pay attention to each detail, you’ll be fine.
First, give the whole maker a quick brush with a damp cloth. Then, remove the plates which keep the blades and rollers hidden. Clean these plates thoroughly. Next, remove the rollers and the blades. You’re going to notice bits and pieces of old pasta. Use a chopstick – or perhaps a wooden skewer – to remove this dry pasta. The wood is less likely to mar the internal pieces.
Next, using a soft cloth and a mild soap, wash each piece of the pasta maker. Rinse them in warm water, and dry them. It’s best not to let them air dry! Instead, get them as dry as possible with a soft towel.
Do a visual inspection of each piece – have you gotten all the grease out? Removed each and every chunk of old pasta dough? It not, repeat the cleaning process.
Finally, you should put your pasta maker back together. You’ve kept each piece separate and set apart, with the appropriate screws nearby. You don’t want to lose any pieces! Be sure that you attach everything as securely as you can. You might to lightly lubricate moving parts with a light splash of olive oil. It will help joints move easier without leaving any unpleasant aftertaste.
Plan on giving your pasta maker a regular clean. You can do it after every use, but if you do it after every second or third use, that’s fine as well. The important thing is to do as good a job as possible each time you go over it. Since your pasta maker is going to be getting a lot of use, getting in the habit of cleaning it will go a long way to keeping those healthy and tantalizing pasta dinners on your table for many years.


